
Workshop Guide - Custom worlds
This guide covers creating a custom world blender.
Skaterift comes with the same tools that I used to make the main game world.
This guide hopes to give you the knowledge on how to put together your own
place to skate.
Please note, it assumes you understand how to model and use Blender.
But this is the only tool you need to make a world.
If you need help with something or you found a bug, I can be contacted at
hgodden00@gmail.com.
0. Things you need
- Skaterift content is made using Blender. You can get
Blender from steam
NOTE:
The addon is designed for Blender version 3.6.
If using steam, you can
switch to this version using the 'Betas' option, and select 3.6 - Stable LTS
- GNU Gimp or similar image editor.
- Download the world_template.zip
- An installed copy of Skaterift of course.
1. Installing exporter addon
Skip this step if you've already done it before. Guide on how to install the exporter addon for Blender
2. Configuring the template
Firstly, Open the .blend file from the world_template zip.
Open the side panel in the 3D Viewport, and find the Skaterift tab, and in
that menu, the Export tab
Export Dir must be set to the game folder, which ends in
/steamapps/common/skaterift/
NOTE:
the path must have a / at the end, else things will break.
3. World editing
Surfaces/Materials
Blender materials get some extra Skaterift properties
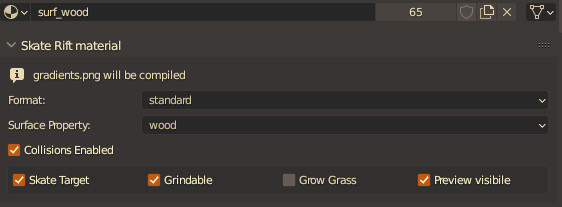
 Format: The type of shader to use

 Surface Property: What is the material made from. This is used for audio.

 Collision Options:
 - Skate Target:    The game will prioritize this material to land on
 - Grindable:       Allow grinding on the corners of this material
 - Grow Grass:      Spawn grass models on this surface
 - Preview Visible: Render this material in the preview hologram
An example material setup:
 Surface | Collision | Skate Target | Grindable | Grow Grass
 Green:    Enabled     Yes            Yes
 Gray:     Enabled                    Yes
 Brown:    Enabled                                Grows
 Blue:     Enabled
 Red:      No

Grindable rails
Here is the standard mesh configuration for creating an ideal rail in Skaterift.

Texturing/Shaders
By changing the format option you have a selection of 5 shaders
(The first 4 use the diffuse texture plugged into the material):
 1. Standard - This is just a textured material
 2. Standard Cutout - Textured material with alpha test
 3. Terrain Blend - This is a special shader which adds an offset to the UVs depending on whether the slope of the surface is above 45 degrees. You can also choose what colour the sand is when the coordinate of the mesh is near 0 on the up axis.
 4. Vertex Blend - Same as Terrain blend but you can paint the transition using the Vertex Paint's Red channel

 5. Water - Does not allow any textures, but you can change the colours of it.
For reference, most of the main world uses Terrain Blend, as it gives a nice crunchy effect on the slopes.
Texturing Skate Rift style
Skate Rifts main map uses 2 textures for the entire thing, it is mostly just a solid colours file with lines that get darker.
When you place the UVs in these lines, the offset will jump back and fourth between the dark and light colours to give the effect you see in the game.
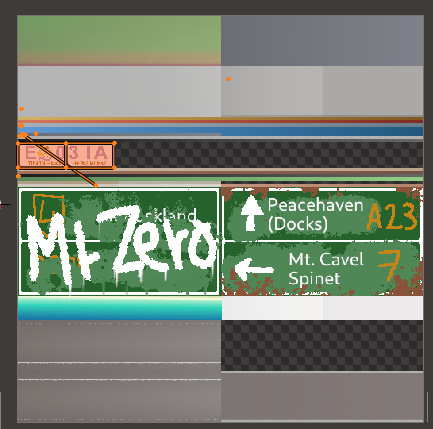
This texture is 512x512, the maximum supported size is 1024x1024.
Entities
Entities are configured through the Entity tab in the 3D Viewport.

The template file contains all you need to get started, but here you can find a
full list of entities and their description
Test Run
In the Outliner panel in the top right, rename the collection name,
called maps/template/main.mdl. You should replace only the word
template. The collection name is the path it will export the
model, relative to the directory we set earlier.
Now in the Skaterift Export tab, press Compile This collection.
The map will now show up in-game, and you can load it.
Theres some helpful commands to debug the map, to open the console, once the
game is loaded, you press the ` (backtick) key. Commands:
 list              - list all commands and variables
 respawn [name]    - reset at this spawn
 world_load reload - reloads current world
 vg_lines 0/1      - helps you debug
 vg_profiler 0/1   - Monitor performance